Hi everyone, here is my layout playing along with the September For the Love of Pretty Paper Sketch. I've used Bramble Fox Perspextives & stencil, and the School Life collection by Simple Stories for this layout.
Play along over on the For The Love of Pretty Paper Facebook group.
Hi everyone! Here is another layout for Cocoa Vanilla Studio
using the Happy Days collection. I decided to make ‘medals’ out of my photos on
this layout using those fabulous colourful stripes from the Sunshine Lollipops
paper.
I started off by gutting the little of the Sunshine Lollipops
paper, in order to preserve the outer edge: I can use this for a different
layout (I have a tendency to be a bit of a thrifty scrapper sometimes!). I then
cut apart the stripes from the gutted piece. I chose 7 stripes to use as a main
feature on this layout, and I distressed the edges of all of them, folded them
in half and also machine stitched down the middle of each one.
I then decided that a white background just wasn’t doing it
for me…and went looking for what patterned papers I could use for a background
instead. I settled on the B side of the Rainbow Bright paper, I love the white
with ditzy hearts and this was perfect to add some interest to my background. I
trimmed it down, distressed the edges and added it to a sheet of white to give
it a boarder.
I arranged my colourful stripes onto the background together
with my large photo which I cut into a circle shape. I cut three more smaller
photos into circle shapes too. From the offcuts of the colourful stripes, I
created little ribbons to add to the bottom of each photo – making them into ‘medals’
or ‘rosettes’. I also did this with a fussy cut frame from the Specialty Paper.
I added my photos to the layout together with Die Cut Ephemera
‘Amazing’ rosette. I then added small embellishments to each one: Floral
Ephemera, Chipboard Phrases, fussy cut words from the Definitive paper,
Chipboard Shapes, Puffy Stickers and phrase stickers from the Accessory
Stickers.
I finished off with a few splatters of white paint over the
colourful stripes and also handwrote in a few lines of journaling.
Thank you so very much for joining me today, I am really
pleased with how this layout turned out!
Today I am guest designing for Peartree Cutfiles and their 3rd birthday celebration! I've used the free Happiness Right Here cut file, and made a layout using Cocoa Vanilla Studio Happy Days Collection.
Play along with the challenge over on the Peartree Cutfiles Facebook group to be in with a chance of winning a prize!
Hi everyone! I’m back with another Guest Design for Bramble Fox!
I’m using the absolutely adorable Picnic in the Park set, it’s so cute! I just
love all the fruits with the etched details and that wooden basket!
I have used The Little Things collection by Simple Stories
for this layout. I’ve used a white background but have trimmed it down and
mounted it onto a multicoloured floral, but I added some red strips to give it
some additional definition.
I then cut several circles out of different patterned papers
which I distressed and layered, and then arranged on my layout in a grid design.
I then added tags, photos and embellishments to each circle. The different
fruits in the Picnic in the Park set meant that I could really spread them
around…there are Perspextives everywhere on my layout!
I’ve also used the Sunburst Stencil behind two of the
circles with yellow ink, to give this layout even more of a feel of summer! I
just love how it turned out, those fruits are really good enough to eat!
Thanks so much to Bramble Fox for having me Guest Design!
Hi again everyone! I have a second layout to share today for
Simple Stories, using the Color Vibe Darks collection. I love these dark
sophisticated colours!
I cut strips of each of the colours to go across my layout
and I distressed the edges of each. I layered them together to form the top
part of my layout. I added three photos in a diagonal stepped formation.
I then layered up lots of the beautiful florals from the Die
Cut Florals pack. I really enjoy using these florals, you get so many in a
packet, and they a great to layer together and make dimensional layouts with. I
made five large florals which I then added at the bottom of my photos.
I embellished the florals with Enamel Dots, leaves and Chipboard
Shapes. I also added a title using the white woodgrain Color Vibe alphabet
stickers, all following the same diagonal formation. I added journaling
underneath and then added a few splatters of black paint.
Thank you so much for joining me today and happy scrapping
Hey everyone! Here is a new layout for Simple Stories using
the Color Vibe Darks collection. When I see these colours together, they remind
me of glamorous occasions and sophistication! They were the perfect colours to
scrap photos of my daughter at her friend’s recent Bat Mitzvah.
The Bat Mitzvah had a ‘logo’ and it is that I have recreated
on this layout: the frame with stars in the corners. I started off by cutting
the middle frame out of one of the papers, and gutted the middle, which I used
to mount my photo.
I also added my title ‘Glam Girls’ using the very beautiful
white wash woodgrain Color Vibe foam alphabet stickers, underneath the frame.
I then set to work on the stars. I used metal dies to cut
different sized stars in each colour from the Darks collection. I then layered
these together with a mixture of colours. I then arranged them on the opposite
diagonal corners. I then added lots more stars from the Chipboard Shapes to
each of these areas. In the gaps I added Enamel Dots too, in several different
sizes.
I finished off by handwriting my journaling around the edge
of the frame, and then I added lots of splatters of black paint. I also doodled
a border around the outside edge of my layout.
Thank you so much for joining me today and happy scrapping
Hey everyone! Here is a new layout for Simple Stories, using
The Little Things Collection. This collection is so lovely, full of yellows (my
favourite!) and pretty florals. It is also really generic so could be used for
almost anything!
I really loved the lemons paper. It has a pink background
and is covered in lemons and leaves. It’s a pretty busy paper so I would
struggle to use it as a whole sheet for a background, so instead I fussy cut
around the lemons and created a border to frame my layout, leaving some white
space in the middle. This works brilliantly, as there are still plenty of
lemons, but the white space in the middle allows the photo and other elements
on the page to have a bit of breathing space.
Once my border was complete, I added my photo layered
together with some fussy cut florals and a fussy cut camera (from a 3x4 card).
I then added a cluster in the bottom left corner of the layout, consisting of a
tag from the Tags paper, another 3x4 card and another large fussy cut bloom.
I added my title using one of the Foam Stickers, and I fussy
cut the words ‘enjoy the little things’ from one of the 3x4 cards which I added
above my title. I added more fussy cut words to the layout around the photo
cluster which I raised on foam pads.
I added a couple of Decorative Brads and some phrase
stickers from the 12x12 Cardstock Stickers. I finished off with some splatters
of black paint and handwrote my journaling onto the tag.
I hope you have enjoyed this layout, I’m really pleased with
how it turned out!
Happy scrapping
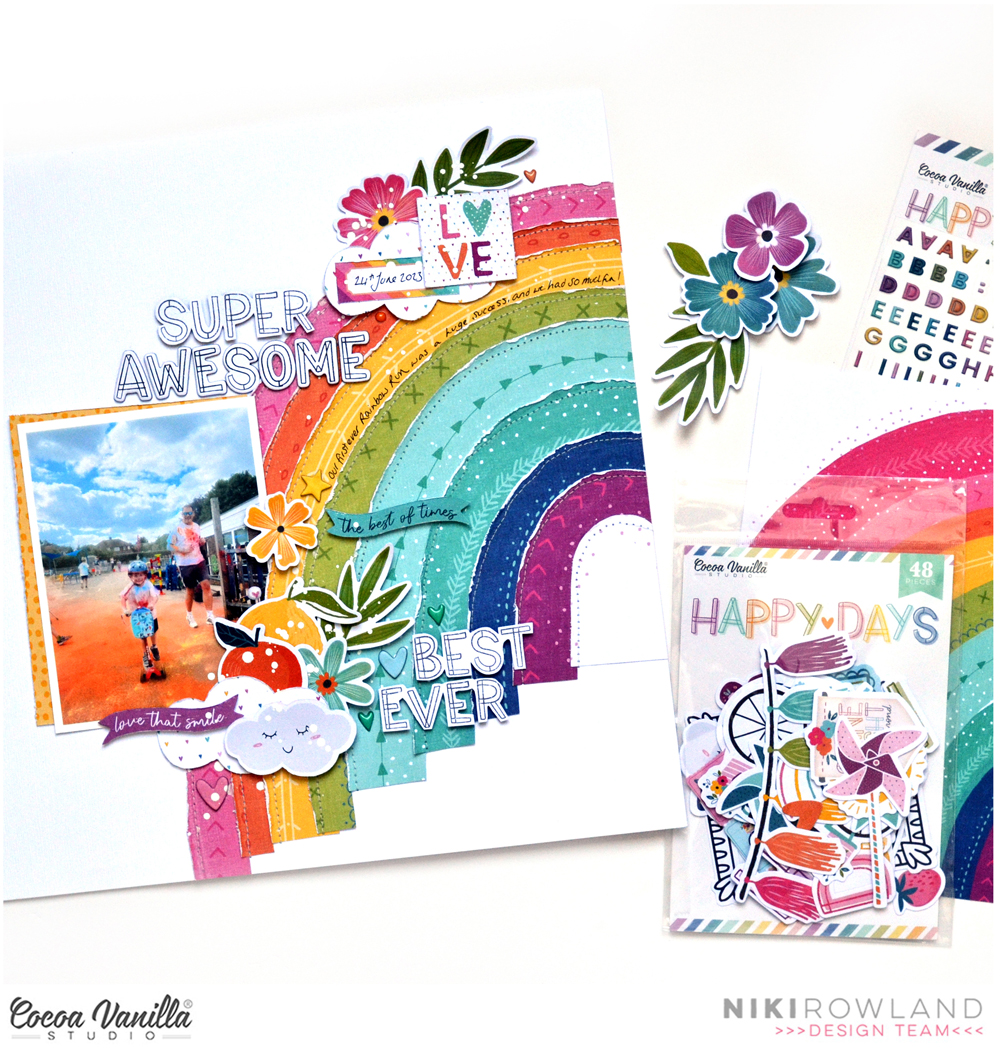
Hi everyone! I’m so happy to be back with another layout for
Cocoa Vanilla Studio using Happy Days. After my Guest Designs over the past two
months, I was delighted to be invited to join the team on a permanent basis!
Thank you so much to Zoe & Cocoa Vanilla Studio for having me!
For today’s layout I decided to use THAT rainbow paper – you
know the one, it’s called Rainbow Bright and has a big beautiful rainbow on it!
I cut all the arcs apart, distressed the edges of all, then
stuck them back together, overlapping a little, onto a piece of white card.
They overlapped the right edge of the cardstock background quite a bit so I
just chopped off the excess. I then added machine stitching around each of the
arcs.
I added my photo to the left side of the page. I wanted to
mount it on yellow paper but didn’t have any left! So I used a piece of the A5 Paper
Stack that I had a small piece of and just about managed to mount two sides of
the photo!
I added some clusters to the top and bottom of the layout. I
included two fussy cut clouds, that I had leftover from when I made a mini
album. I also added Die Cut Ephemera, and Floral Ephemera to these clusters and
Accessory Stickers too.
For my title I used ‘super’ fussy cut from the Definitive paper
and the word Awesome from the Chipboard Phrases. I also added a sub-title ‘best
ever’ also fussy cut from the Definitive paper.
I finished off by handwriting my journaling around the
yellow arc, and adding a few chipboard hearts and puffy hearts to the layout!
I absolutely love how this one turned out and I hope you do
too! Thanks so much for joining me today and happy scrapping!
Hey everyone! Have you seen the new August sketch over on For the Love of Pretty Paper? I've played along with this layout using the Boho Sunshine collection from Simple Stories. I've used a whole sheet of 6x8 paper from a paper pad for my title!
Hey everyone! I’m delighted to be Guest Designing for
Bramble Fox today! I’m using the Summer Adventures set and specifically, the
word SUPER. The colours on those letters made me want to make a ‘boy’ layout and
we’ve recently celebrated my little boy’s 5th birthday, so I’ve used
a photo from his birthday party.
I went through my stash to find a slightly older collection:
Family Fun by Simple Stories. I love the bright colours in this collection and
the pops of black – perfect!
I choose two papers, cut them into triangles and arranged
them all pointing at my photo. I added doodled borders to all the triangles and
added the Perspextive word ‘SUPER’ to a solid red triangle to ensure it stood
out really well. I extended the title by using the word ‘Fun’ from the paper
collection.
To one side of my photo, I used the Sunburst Stencil – my most
favourite ever stencil! I used a Distress Oxide to ink the rays and added
definition using a black journaling pen.
I finished off with splatters of black ink and a few
embellishments! Thanks so much for joining me today, I hope you’ve enjoyed
seeing this layout and I’ll be back again later in the month with another Guest
Design for Bramble Fox!