Hi everyone, here is a new layout for Simple Stories using
the FaBOOlous collection! I adore Halloween so was super excited to cut into this
collection.
I started off with that cute orange pumpkin face paper which
I trimmed down and folded over one corner. I made a feature out of that folded
corner by including lots of Floral Bits and Bits & Pieces.
I added my two photos over on the right side of the layout
together with the large FaBOOlous word from the Page Pieces. I built another
cluster over to the right side of the title, including Floral Bits, Bits &
Pieces, and Cardstock Stickers.
I then created a feature in the top right corner using
Chipboard Stickers and word stickers from the Cardstock Stickers.
I added Decorative Brads and Enamel Dots to each of my
clusters and added splatters using black paint.
This layout turned out so fun, I love it and I hope you
enjoyed it!
Hey everyone! Here is another layout using the gorgeous
Acorn Lane collection by Simple Stories. I love the mustard colour in this
collection and wanted that to be the main colour on this layout. So I picked
out the beautiful leaf paper, and paired this with a sheet of Mustard Color
Vibe cardstock. I layered them together and used these for a large portion of
my background.
I arranged three photos and a journaling card in a grid design
and then added a tag from the Tags paper, and then set to work embellishing. I
made two large clusters consisting of Floral Bits, Bits & Pieces, Chipboard
Stickers and Cardstock Stickers. I also added Decorative Brads to these
clusters.
I finished off the layout with splatters of gold paint and I
also drew a doodled border around the edge of the Mustard cardstock. I hope you
enjoyed seeing this layout, I’m really happy with how it turned out!
Hi everyone! Here is my first layout using Acorn Lane by
Simple Stories! I love the patterns and colours in this collection and all the
autumn themed icons! For this layout I used a couple of sheets of Color Vibe cardstock:
a sheet from the Woods collection of which I used the white ledger B side, and
a sheet of blue Cornflower. I used these together for my background.
I cut a large circle from the blue plaid print and also cut
a small circle from the middle of it which I turned over. I arranged these
together with three tags from the Tags paper, onto my layout together with my
two photos.
I created two embellishment clusters using Floral Bits and
Bits & Pieces. I also used a few pieces from the Chipboard Stickers and
Decorative Brads.
I added my own title using alpha stickers from the Acorn
Lane Sticker Book ‘Pumpkin kisses’. I finished off with splatters of gold paint
for a shimmery autumn feel!
Thanks so much for joining me today and happy scrapping
Hey everyone! Here is a new layout for Simple Stories using
the very pretty What’s Cookin’ collection. I rarely scrap about the things I
cook or bake so this was the perfect opportunity to scrap a story about that!
I choose a pretty pink floral pink patterned paper for my
background and trimmed it down. I mounted this onto another brighter pink
patterned paper and then added these to a white background. I folded down the
top left corner for a bit of added interest.
I then cut a wide strip of the stripy paper, cut in-between
all the stripes and cut them into v shapes. I added this strip across the
layout with a strip of patterned paper at the top too – this reminded me of the
frills of an apron! I added some zig zag machine stitching to this area and I also
added some at the top corner too.
I added a square photo which I mounted onto patterned paper
and then I added this to the layout together with lots of lovely Bits &
Pieces. I added a ‘note’ card behind the photo, chipboard apron from the
Chipboard Stickers, mixer and ‘Family Home Kitchen Food’ Chipboard Layered
Sticker.
I carried on adding lovely embellishments to my layout. I
picked out all the elements that were relevant to my photo: jar of utensils,
mixing bowl & whisk, cupcake liners, bag of flour and bag of sugar – how cute
are all these!
I added a few more bits: phrase labels from the Cardstock
Stickers, Decorative Brads and Enamel Dots. I also added some more Bits & Pieces:
the heart shapes, to my paper stripes.
I hope you have enjoyed seeing this layout come together! I
really enjoyed making it and I love how it turned out!
Hi again everyone! I have a second layout to share today for
Simple Stories, using the Color Vibe Darks collection. I love these dark
sophisticated colours!
I cut strips of each of the colours to go across my layout
and I distressed the edges of each. I layered them together to form the top
part of my layout. I added three photos in a diagonal stepped formation.
I then layered up lots of the beautiful florals from the Die
Cut Florals pack. I really enjoy using these florals, you get so many in a
packet, and they a great to layer together and make dimensional layouts with. I
made five large florals which I then added at the bottom of my photos.
I embellished the florals with Enamel Dots, leaves and Chipboard
Shapes. I also added a title using the white woodgrain Color Vibe alphabet
stickers, all following the same diagonal formation. I added journaling
underneath and then added a few splatters of black paint.
Thank you so much for joining me today and happy scrapping
Hey everyone! Here is a new layout for Simple Stories using
the Color Vibe Darks collection. When I see these colours together, they remind
me of glamorous occasions and sophistication! They were the perfect colours to
scrap photos of my daughter at her friend’s recent Bat Mitzvah.
The Bat Mitzvah had a ‘logo’ and it is that I have recreated
on this layout: the frame with stars in the corners. I started off by cutting
the middle frame out of one of the papers, and gutted the middle, which I used
to mount my photo.
I also added my title ‘Glam Girls’ using the very beautiful
white wash woodgrain Color Vibe foam alphabet stickers, underneath the frame.
I then set to work on the stars. I used metal dies to cut
different sized stars in each colour from the Darks collection. I then layered
these together with a mixture of colours. I then arranged them on the opposite
diagonal corners. I then added lots more stars from the Chipboard Shapes to
each of these areas. In the gaps I added Enamel Dots too, in several different
sizes.
I finished off by handwriting my journaling around the edge
of the frame, and then I added lots of splatters of black paint. I also doodled
a border around the outside edge of my layout.
Thank you so much for joining me today and happy scrapping
Hey everyone! Here is a new layout for Simple Stories, using
The Little Things Collection. This collection is so lovely, full of yellows (my
favourite!) and pretty florals. It is also really generic so could be used for
almost anything!
I really loved the lemons paper. It has a pink background
and is covered in lemons and leaves. It’s a pretty busy paper so I would
struggle to use it as a whole sheet for a background, so instead I fussy cut
around the lemons and created a border to frame my layout, leaving some white
space in the middle. This works brilliantly, as there are still plenty of
lemons, but the white space in the middle allows the photo and other elements
on the page to have a bit of breathing space.
Once my border was complete, I added my photo layered
together with some fussy cut florals and a fussy cut camera (from a 3x4 card).
I then added a cluster in the bottom left corner of the layout, consisting of a
tag from the Tags paper, another 3x4 card and another large fussy cut bloom.
I added my title using one of the Foam Stickers, and I fussy
cut the words ‘enjoy the little things’ from one of the 3x4 cards which I added
above my title. I added more fussy cut words to the layout around the photo
cluster which I raised on foam pads.
I added a couple of Decorative Brads and some phrase
stickers from the 12x12 Cardstock Stickers. I finished off with some splatters
of black paint and handwrote my journaling onto the tag.
I hope you have enjoyed this layout, I’m really pleased with
how it turned out!
Happy scrapping
Hello everyone, here is a new layout for Simple Stories
using the gorgeous The Little Things Collection. I’m loving this collection, it
is quite generic and very versatile and easy to use, full of pretty colours and
florals, it is a really lovely collection to work with.
I adore scrapbooking with yellow – it’s just a bright happy
colour that makes me happy, so I decided to use that beautiful yellow floral
print as a large part of my background. It’s quite busy so I wanted to pair it
with some white space, so I trimmed it down to 8½” wide so there was a large
white area on either side. I paired this with the lilac patterned paper from The
Little Things collection which is what I mounted my photo with, and I also
added torn strips of this down each edge of my yellow floral paper.
I created three clusters on this layout, each contain
similar repeating elements: flowers, butterflies, and phrases from the Always
Remember paper. I fussy cut several of those phrases, distressed the edges of
all and raised them up on foam pads. I love the contrast of black against the
yellow and lilac, it really makes them pop off the page!
For my title I used ‘the little things’ from the Bits &
Pieces pack. Again, I distressed the edges and raised this on foam pads. This
helped it stand out against the busy floral background. I added a few Decorative
Brads, handwrote my journaling down the right side of the layout and then splattered
the clusters with black paint – again that pop of black contrasts so well with
the bright yellow, I love the result of this combination!
Thanks so much for joining me today and happy scrapping!
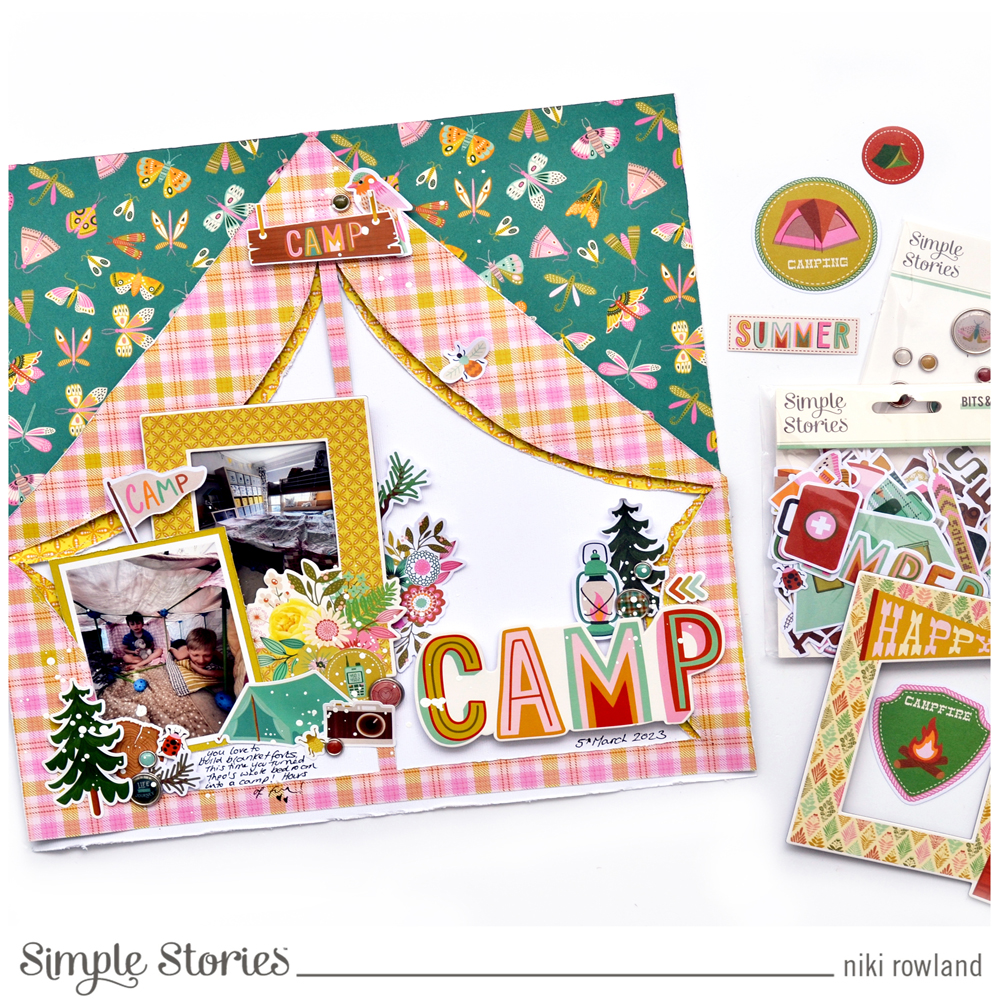
Hi everyone! Here is another layout I have made for Simple
Stories using the Trail Mix collection. For this layout I decided to make a
camping ‘scene’ on my layout and to actually make a tent!
I started off by sketching out my idea onto some scrap paper
and then when I was feeling confident, I lightly drew the basic shape of the
tent onto a piece of patterned paper. After a few attempts and when I was
finally happy with it, I cut it out and distressed the edges. I created another
layer around the canopy with some leftover yellow paper from my previous Trail
Mix layout. I distressed the edges of this too, and I added some machine
stitching around the edges of both. I then layered them together and added them
to a white card background.
I then decided to add the two large triangles cut away from
the top of the tent – I turned these over and immediately loved the green
background with the butterflies and moths. I hadn’t planned on adding a
background to the tent, I figured I’d just leave it white, but the triangles
worked perfectly and I’m so pleased I thought of this!
I used one of the Trail Mix Chipboard frames for one of my
photos, and I mounted the other on a yellow journaling card. I positioned these
on the left side of my layout and added the title ‘camp’ from the Foam Stickers
on the right side of the layout.
I then added a number of smaller details: the ‘camp’ hanging
sign at the top of the tent, a couple of tree Cardstock Stickers, ‘camp’ flag,
tent, camera, log, camping lamp. I love all these cute little details that all
work so well together to create a scene! My photos are actually of my children
inside a blanket fort, rather than actually outside in a tent, but hey, I think
it works!!
I added some Decorative Brads to the clusters, handwrote my
journaling and finished off with some splatters of white paint. I absolute love
how this one turned out, it is so cute!
Thank you so much for joining me today and happy scrapping!
Hi everyone! Here is a new layout for Simple Stories, using
the awesome Trail Mix collection! Now, my family aren’t really campers, but
this collection makes me wish we were! It’s packed full of fun prints and icons
that are outdoorsy and camping themed. The colours are just gorgeous, fun plaid
prints with some muted colours, coupled with pops of bright! I love everything
about it.
For this layout I choose one of those gorgeous plaid prints
for my background. I trimmed it down a little and added it to a sheet of white.
I splattered white paint onto the background and set it aside to dry. I then selected another patterned paper, a multi
coloured plaid print with flower clusters. I cut this into a circle and cut a
small circle out from the middle. I then cut it into pieces, so I had a divided
circle. I distressed the edges of each piece and then reassembled it back into
a circle shape on my background.
I cut my photo into a segment shape and added it to one of
the segments. I then added some of the Patches Bits to the circle. I arranged
these in clusters, one above my photo and one to the bottom right of the circle.
As well as the Patches Bits, I also added some floral clusters from the Cardstock
Stickers, Foam Stickers and Decorative Brads to each cluster.
I used ‘Explore’ from the Foam Stickers as my title. I love
the size, font and fun colours on this! I added a few more stickers from the
Cardstock Stickers – some of the phrases, which I distressed the edges of and
raised on foam pads.
I also used the long cardstock boarder sticker from the
Cardstock Stickers, which I cut into two pieces and added to both side of my
layout, offset and unequal, just to give a bit of added interest to the side
edges of my layout. I finished off by handwriting my journaling.
Thanks so much for joining me today and happy scrapping!